|

|
Maritime Topics On Stamps :
The Spanish Armada!
| |
The Armada’s approach.
|
|
The 16th Century saw a Europe divided into two religious camps, Protestants
and Catholics. Religion had assumed supreme importance. England resisted the
Pope and became protestant. Spaniards remained catholic. King Philip II
intended to return first England and later all of Europe to the old faith.
The catholic nations were shocked when England’s Queen Elizabeth I (on stamp
at right) signed the death warrant against her catholic competitor and
cousin on Scotland’s throne, Mary Stuart, in 1587. Philip II had been
challenged.
|

| |
Then there was the quest for supremacy in commerce and on the high seas.
Spain had discovered the ‘New World’ and dominated the trade also coveted by
England. Englands naval strength was growing. And England was strategically
positioned next to Spain’s possessions in the Low Countries, ruled by the
Duke of Parma. Philip II intended to pick up those Spanish troops in the
Netherlands and to attack England. The Armada’s main objective was not
fighting naval battles but to assist and secure the Duke’s invasion and
occupation of Elizabeth I’s kingdom.
|

|

|
|
Spain’s Admiral Santa Cruz, hero of Lepanto, was ordered to assemble a huge
fleet but he died during the preparations. His successor was the Duke of
Medina Sidonia, an organizer rather than a naval commander. Departing from
Lisbon in 1588 Spain and Portugal being united under one sovereign at the
time the Armada consisted of 130 large and small ships. The most powerful
units were twenty galleons, each with up to 50 heavy guns and complements of
500 men. As seen of both stamps, galleons had rather high poop structures.
Spain’s tactics in sea warfare were the same of centuries past: After some
broadsides one tried to board the enemy and continued the battle
hand-to-hand. This accounts for the high numbers of soldiers and relatively
few seamen. The Duke of Medina Sidonia’s flagship was the 1000-ton galleon ‘
SAN MARTIN’.
|
|

|
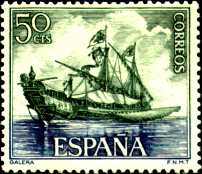
Four galleys (stamp at left) and six galleasses. Their minimal drafts made
them well-suited for shallow waters but unable to fight in stormy seas. Some
150 chained rowers provided speed and maneuverability. The galleasses like
the galleons were armed with up to 50 guns each.
There were 44 carracks, former merchantmen provided with high superstructures
and heavy artillery. 23 urcas (on right stamp) carried military stores and
supplies. In addition there were some two dozen small 70-ton ‘pataches’
serving as guard and dispatch vessels.
The Armada of 130 ships organized into ten squadrons carried some 8,700
sailors, 2,100 galley slaves, 21,800 soldiers, 150 gunners, 85 surgeons,
180 priests, and 50 administrative officials. The Spaniards called it ‘La
Armada Felissima y Invencible’ (‘The Most Fortunate and Invincible Fleet’).
|

|
|
The English fleet was divided between some 54 ships (some sources say 47) at
Plymouth commanded by Lord Howard, and some 80 vessels at Dover under the
command of Lord Seymour and Lord Winter, the latter keeping a watchful eye on
the Duke of Parma and his army. The western squadrons were led by Lord
Howard in his flagship ‘ARK ROYAL’ (left stamp, with medallion of the Queen)
and famous seafarers Sir Francis Drake in the ‘REVENGE’, John Hawkins in the
‘VICTORY’, and Martin Frobisher in the ‘TRIUMPH’.
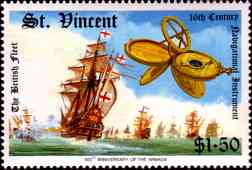
The English vessels
(stamp at right) were smaller but faster and more weatherly than the Spanish
with their high superstructures. Their tactics were not aimed at boarding but
at delivering broadsides while outmaneuvering the enemy. The principal units
consisted of 18 galleons with 40-50 guns each.
The stamp at right shows Drake’s multi-purpose navigational instrument. It
enabled azimuth measuring, had tide tables, a sun dial, a compass, a
perpetual calendar, and furthermore was a nocturnal (for measuring the time
of night by means of Polaris and Ursa Major or Ursa Minor).
|

|
England had had almost two years time to prepare for the Spanish invasion.
The southern coastline was readied with signal towers and pyres, each harbor
was newly surveyed, and defenses were strengthened. Spiked palisades were
erected to obstruct potential landing sites. There was a standing militia in
every county.
Spain never tried to keep the planned invasion a secret. A London publisher
even printed a translation of the Spanish manual with ‘Instructions for the
Spanish Fleet’...
| |
On May 30, 1588, the Armada sailed from Lisbon but encountered such heavy
weather that 20 days later it had to put in to La Corunna for repairs and
provisions. Mid-July it embarked again on its endeavour against England.
|

| |
The stamp at left shows the Armada sailing past the Lizard on July 19. The
stamp at right depicts the first fleet engagement off Plynouth. There were a
series of attacks by the swift English vessels but no major naval battle
ensued. Casualties on both sides remained small.
|
|
Then two mishaps befell the Armada. First, the 900-ton galleon ‘SAN
SALVADOR’ was lost due to an explosion, its cause never established. Second,
the ‘NUESTRA SENORA DE ROSARIO’ collided with a convoy ship and lost its
bowsprit. The next night, a storm broke out and the foremast broke, causing
the vessel to be unmaneuverable (see stamp). Sir Francis Drake encountered
her in this condition and engaged. The Spanish captain struck the colors.
| 
|

|
The following days saw two more engagements off Portland Hill and the Isle of
Wight (shown on stamp). The actions demonstrated the superior skills of the
English gunners. No vessels were boarded. Yet, the fights ended in a draw,
and both fleets started to run low on ammunitions.
The above stamp depicts some types of cannonballs and other nasty shot.
|

|

|
|
Medina Sidonia continued up the Channel closely followed by the English
fleet. On July 27 the Armada anchored off Calais to await the Duke of Parma’s
troops for the planned invasion in vain. Two nights later Lord Howard sent
eight fireships down onto the enemy (shown on the stamps), causing much
confusion and panic among the Spaniards. All they could do was cut their
cables and make sail before the wind to escape the fiery scene. The Armada
was now completely scattered and disorganized.
|
|
The following day the English fleet, now 140 ships strong, went after the
Spaniards. A major engagement developed off Gravelines, in which three of the
best Spanish ships were lost. The ‘SAN MARTIN’ was attacked first by Drake’s
squadron, then by Frobisher’s. Despite some 200 hits on her starboard side
alone, and her rigging in tatters, she did not sink. Two divers worked damage
control day and night stopping the leaks with lead plates and oakum. — The
stamp shows Drake’s ‘REVENGE’ and his famous drum. (An English legend has it
that if England ever should be endangered again, the drum will roar calling
for Drake’s assistance.)
|

| |
Once again the Armada assumed a defensive crescent shaped formation. Still,
again and again, the Spaniards continued to be tormented by constant
broadsides from the English gunners. Shot full of holes, with splintered
masts, torn sails and rigging, a sudden rain squall allowed the Armada to
escape northwards into the North Sea. English casualties were about 100 dead
and some holed vessels, yet none of them sunk. The Spaniards mourned some 600
dead and had lost three galleons. Many surviving ships were heavily damaged
and had to be hastily repaired with jury rigs.
|

|

|
|
On the day following the battle, the Spanish commanders once again vowed to
continue in the endeavor to unite with the Duke of Parma’s troops. Yet it
wasn’t to happen. A hurricane-force storm lasting five days drove the
Spaniards northwards along the Scottish coast, as seen on these stamps.
After the storm it was evident that the leaky crippled ships were unable to
sustain further combat and the decision was made to round Scotland and
Ireland and to return to Spain. But their predicament became even worse. An
interminable series of contrary winds, fog, autumn storms, and tricky
currents caused some fifty of their vessels to be sunk after taking on too
much water, or to be wrecked on reefs, cliffs, or shoals where they were
pillaged and their crews mercilessly slaughtered. The few ships still afloat
were lacking drinking water and provisions and then suffered from outbreaks
of cholera, dysentery, and typhus.
|
|
The stamp at right shows the Spanish ‘DUQUESA SANTA ANA’ off the Irish
coast. Filled to overcapacity with shipwrecked survivors from a number of
ships, her Master tried to reach a neutral port in Scotland. Yet, another
violent storm intervened. Blown towards the shore, while trying to anchor the
chain broke and the ‘DUQUESA’ became another wreck.
|

| |
Of the Armada’s 130 ships that had left Lisbon, only 67 returned. Of some
33,000 sailors, soldiers, and galley slaves aproximately 20,000 had lost
their lives due to combat, fire, shipwreck, drowning, disease, and hunger.
The official English version counted just some100 dead countrymen, with not
one ship sunk. Yet, this ought to taken with a grain of salt as many of their
vessels had suffered heavy damage and untold men died of their wounds ashore
later on.
[The above mentioned numbers of ships and complements were taken from the
latest British publications. Another source mentions an Armada strength of
515 ships with 64 galleons and 30,000 men, and losses of 64 vessels with
15,000 men. English numbers have sometimes been given as 200, 197, or 140
ships with 15,000 armed men aboard, and some 80,000 stationed at points along
the English coast.]
|
|